Description
Neurosmith’s Musini was designed to sense vibrations created by moving children and trigger pre-recorded music in response to the speed and intensity of those vibrations. The Musini comes stock with 5 music styles, each with 4 instrument sections for a complete ensemble of high quality STEREO sounds. If this device doesn’t scream “BEND ME!!!”, I don’t know what does… So, with a little poking and prodding I managed to turn this one into a hideous, screeching, squealing noise monster capable of dynamics from subtle, organic drones to obnoxious walls of sheer noise.
Exploring the Process
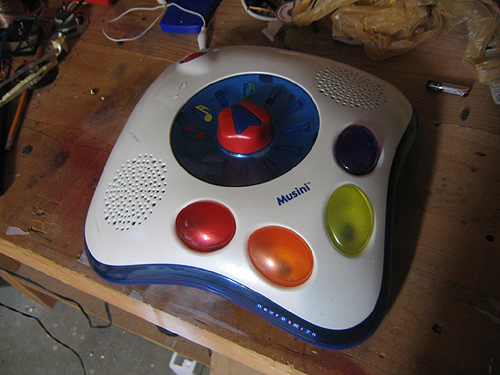
Every so often a trip to the local thrift store pays off, but rarely as good as my last trip – which yielded a perfectly functional Musini interactive toy. I’d heard soft murmurs wafting across the internet regarding this toy as a treasure trove of bent goodness. And when I saw the $1.50 price tag, it was a guaranteed buy. So I got the little bugger home, popped some batteries into it and was instantly gratified with the appropriate bleeps and LED flashes.
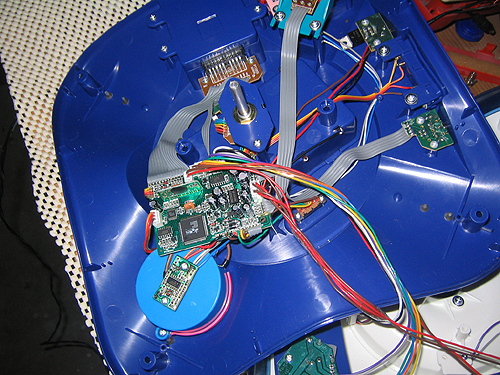
Most of the device’s size is for show. Not much under the hood.
Anxious for the adventure I promptly pulled the screws out of the body of the case and gently pried the top off. This proved a little awkward at first for two reasons: 1) there are two screws underneath the batteries that I initially failed to locate and 2) the knob on the rotary switch is a tight fit and had to be coaxed off. Once I got into the device I was a little surprised at the desolation. The main circuit board was tiny and most of the housing is just wasted space necessary for the aesthetic design. But I shouldered on and started poking around. Being a predictable beast, the first thing I tried was snipping the red wire coming from the battery harness and testing a voltage starve. I was well rewarded for my efforts and found a sweet spot between 4.5 and 5 volts that produces all kinds of glitchy nonsense. That’s when I noticed that the mains power was also wired in such a way that it could be starved. Bonus! So I took a few minutes and wired both power sources to a DPST switch and pot.
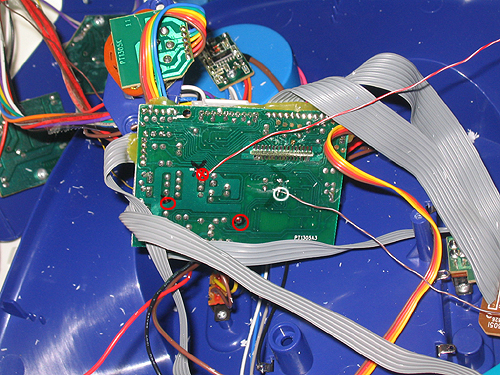
The distortion bends on the main board.
After I had that finished I pulled the screws out of the main board and flipped it over to see what we could see. I’m really not a big fan of SMT boards (at all), so I was interested to see what could be done with the traditional components first. I found a series of tone generating bends which I left alone because I have other devices with those sounds. I did manage to find one horrendous body contact (white) and two overdrive/distortion bends (red).
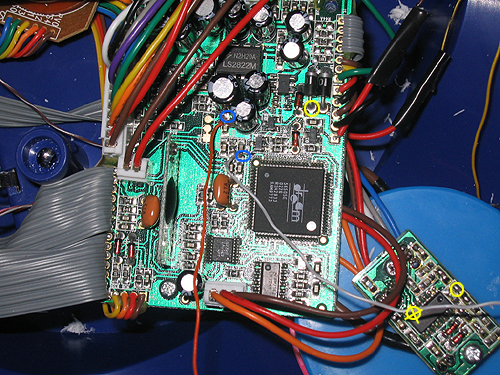
Pitch and trigger bends.
Next I went back to the top of the board and spent a while poking around without much luck. I’d glanced over a short write-up on Kevin Rees’s site and checked out the areas he suggested but found nothing of note. I did find a pitch bend (blue) in a different location, with which ended up using a pot, which I also discovered turns into a massively ugly, glitchy distortion when the voltage is starved to the sweet spot. There’s a smaller board mounted on top of what I assume is the part of the device that sense vibrations. The IC chip on this board seems to trigger the device. I found a dozen points and many dozens of combinations for momentary triggering, but had to go back to the main board to find a bend that triggered the device continually (yellow).

Switch description.
1. DPST rocker switch for voltage starve knob. Allows user to choose which power source (battery or mains) is running to the voltage starve knob.
2. Body contact. Harsh overpowering distortion with a subtle organic feel.
3. SPST toggle switch for continuous triggering. Triggers the device continually when turned on, preventing the need to trigger sounds manually.
4. SPST momentary pushbutton for triggering. Normally open momentary switch that, when closed, triggers the next phrase in the sampled series.
5. Rheostat for voltage starve. A 25 ohm Radio Shack standard rheostat for starving both battery and mains voltage down to a critical threshold.
6. SPST toggle and 1k linear potentiometer for pitch control. Toggle turns bend on and off while pot controls effect.
7. SPST toggle and 50k logarithmic potentiometer for massive overdrive. Toggle (should) turn bend on and off while pot controls effect.
8. SPST toggle for hideous distortion.
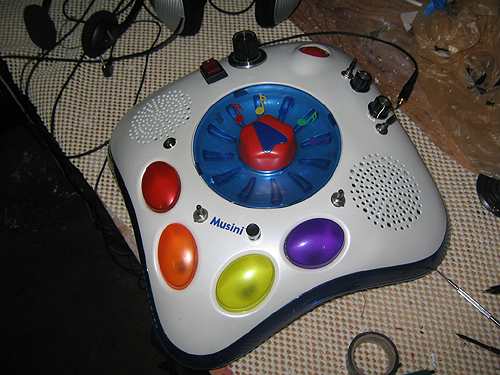
Ready for a pimpin’ good time.
With all this done I decided this was a fair first attempt at the fabled Musini. The one big downfall to my methodology here is that the triggering bends were the last ones I found. Up until that point I’d been starving the voltage to keep the device playing sound. I most likely missed a few bends that didn’t work with the voltage at such low levels. But, by the time I found the triggering bend, I wanted to wrap the project up and move on the next one. Maybe one day I’ll crack this one back open and give it another round of exploration.